Monthly Archives: March 2026

burgundy shoe style guide

Burgundy Shoe Style Guide: A Comprehensive Overview

Navigating the world of men’s fashion often presents challenges, but burgundy shoes offer a surprisingly versatile solution.
Despite access restrictions on some style resources as of March 30, 2026,
the enduring appeal of this color remains strong, offering a sophisticated alternative to traditional browns and blacks.

Understanding Burgundy’s Versatility

Burgundy, a rich and nuanced shade between red and purple, possesses a remarkable ability to complement a wide spectrum of outfits. Unlike bolder reds that can be visually overpowering, burgundy offers a more subdued yet impactful statement. This inherent versatility stems from its complex undertones, allowing it to function as both a neutral and an accent color.

As evidenced by style guides (though currently facing access restrictions as of March 30, 2026, with Cloudflare restrictions noted – Ray ID: 9e4898d649aed690), burgundy shoes bridge the gap between formal and casual wear. They pair exceptionally well with navy, grey, and even olive green, offering a sophisticated alternative to brown or black. The shade’s adaptability makes it suitable for various shoe styles, from elegant Oxfords to relaxed loafers and modern Chelsea boots, proving its enduring appeal in contemporary menswear.

The History of Burgundy Footwear

Tracing the origins of burgundy footwear reveals a fascinating evolution tied to historical dye production and aristocratic fashion. Initially, achieving true burgundy shades required expensive natural dyes derived from sources like the Kermes insect or madder root, making them exclusive to the wealthy elite during the medieval and Renaissance periods. These deep, wine-toned colors signified status and refinement.

While specific records detailing early burgundy shoe styles are limited (access to comprehensive historical fashion databases is currently restricted as of March 30, 2026 – Cloudflare Ray ID: 9e4898d649aed690), the color gradually permeated men’s wardrobes throughout the 19th and 20th centuries. Its resurgence in modern menswear reflects a renewed appreciation for classic colors and sophisticated aesthetics, moving beyond purely practical considerations to embrace stylistic nuance and heritage.

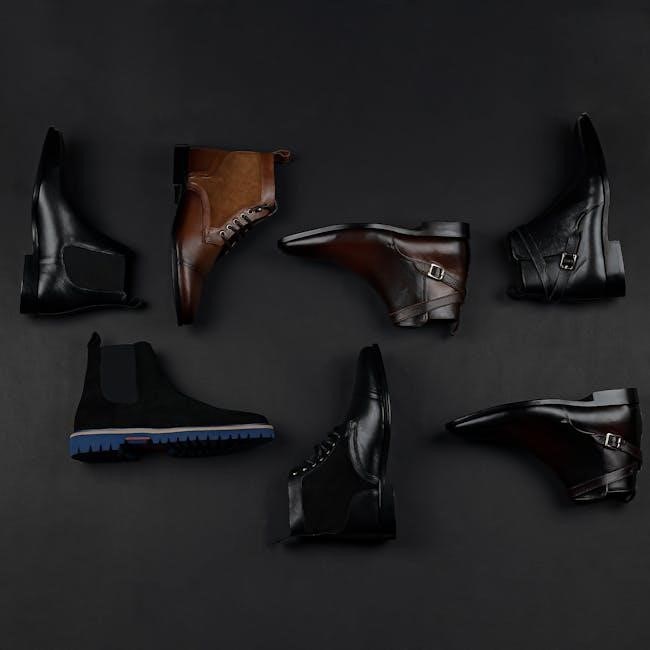
Burgundy Shoe Materials: Leather, Suede, and More

Burgundy shoes are crafted from a variety of materials, each impacting the shoe’s aesthetic and suitability for different occasions. Full-grain leather offers durability and a polished sheen, ideal for formal settings like pairing with suits. Suede provides a softer, more textured appearance, lending itself to smart-casual looks and warmer weather. The choice significantly alters the overall impression.

Beyond leather and suede, variations like calfskin, nubuck, and even exotic leathers (though less common in burgundy) contribute unique characteristics. Material selection also influences care requirements; suede demands more diligent protection against moisture, while leather benefits from regular conditioning. As of March 30, 2026, accessing detailed material guides is intermittently restricted (Ray ID: 9e4898d649aed690), but understanding these distinctions is crucial for informed purchasing.

Burgundy Oxford Shoes: Classic and Formal

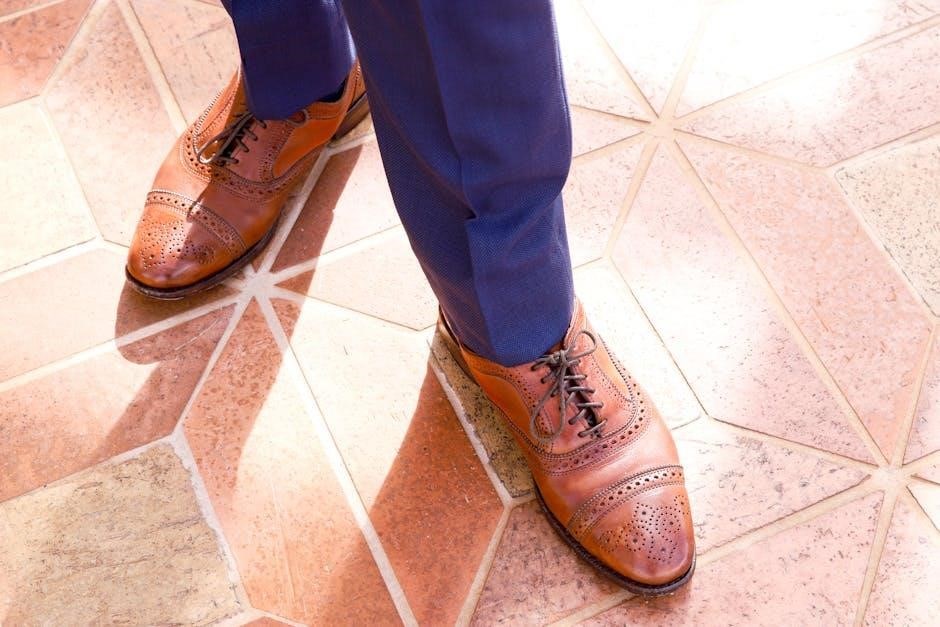
Burgundy Oxford shoes represent a sophisticated departure from traditional black or brown, maintaining a distinctly formal aesthetic. Their closed lacing system and sleek silhouette make them exceptionally versatile for occasions demanding a polished appearance. The depth of burgundy adds a touch of personality without sacrificing professionalism, making them a compelling choice for those seeking subtle distinction.

However, navigating style resources as of March 30, 2026 (notably lookastic.com, currently restricted – Ray ID: 9e4898d649aed690) reveals that successful integration hinges on careful coordination. Burgundy Oxfords excel when paired with complementary colors and fabrics, elevating ensembles beyond the commonplace. They bridge the gap between conservative and contemporary, offering a refined yet approachable style statement.

Pairing Burgundy Oxfords with Suits

When integrating burgundy Oxford shoes with suits, a nuanced approach to color harmony is crucial. Navy and charcoal grey suits provide an exceptional backdrop, allowing the burgundy to subtly pop without appearing ostentatious. Avoid overly bright or patterned suits, as they can clash with the shoe’s inherent richness. A classic navy suit, paired with a crisp white shirt and a burgundy tie, creates a balanced and sophisticated look.

Considering current online resource limitations (as of March 30, 2026, with lookastic.com access restricted – Ray ID: 9e4898d649aed690), remember that suit fabric also matters. Wool suits generally complement burgundy better than linen. The goal is to create a cohesive ensemble where the shoes enhance, rather than dominate, the overall aesthetic. Subtle details, like matching sock color, further refine the presentation.

Burgundy Oxfords for Business Casual

Burgundy Oxfords effortlessly elevate business casual attire, offering a refined alternative to more conventional footwear. Pair them with chinos in shades of khaki, grey, or navy for a smart yet relaxed appearance. A button-down shirt, perhaps in a light blue or white, complements the burgundy hue beautifully. Consider incorporating a blazer – a navy or tweed option works particularly well – to further enhance the polished aesthetic.

Despite current website access issues (noted on March 30, 2026, with lookastic.com restricted – Ray ID: 9e4898d649aed690), remember that sock choice is key. Opt for socks that either match the burgundy shoes or subtly complement the chinos. Avoid overly bold patterns. The aim is to create a look that is both comfortable and professional, demonstrating attention to detail and a sophisticated understanding of style.

Burgundy Loafers: Effortless Style

Burgundy loafers embody a relaxed yet sophisticated aesthetic, making them incredibly versatile for a range of occasions. They bridge the gap between formal and casual with ease, offering a comfortable and stylish alternative to more structured footwear. The rich hue adds a touch of personality without being overly ostentatious, making them a fantastic choice for those seeking understated elegance.

Despite recent website access limitations (as of March 30, 2026, with lookastic.com facing restrictions – Ray ID: 9e4898d649aed690), the core principle remains: burgundy loafers pair exceptionally well with tailored trousers, chinos, and even dark-wash jeans. They can be worn with or without socks, depending on the desired level of formality and the weather. This flexibility is what truly sets burgundy loafers apart, solidifying their place as a wardrobe staple.

Penny Loafers in Burgundy: A Timeless Choice

The burgundy penny loafer represents a cornerstone of classic menswear, offering a refined and enduring style. This silhouette, characterized by its signature strap across the vamp, exudes a preppy yet sophisticated vibe. Despite encountering website access issues on platforms like lookastic.com (documented on March 30, 2026, Ray ID: 9e4898d649aed690), the inherent appeal of this shoe remains undiminished.

Burgundy enhances the penny loafer’s versatility, allowing it to seamlessly transition from smart-casual to more dressed-up ensembles; Pair them with chinos and a button-down shirt for a polished look, or with tailored shorts during warmer months. The rich color complements navy, grey, and even olive green, offering numerous styling possibilities. Investing in a quality pair of burgundy penny loafers is a decision that will elevate your wardrobe for years to come, proving their timeless nature.

Tassel Loafers in Burgundy: Adding Personality

Burgundy tassel loafers inject a distinctive flair into any outfit, moving beyond the traditional boundaries of classic footwear. While accessing style guides can sometimes be restricted – as noted by Cloudflare’s Ray ID 9e4898d649aed690 on March 30, 2026, impacting sites like lookastic.com – the inherent style of these loafers remains undeniable. The playful tassels offer a touch of personality, differentiating them from the more understated penny loafer.

These loafers pair exceptionally well with textured trousers like corduroys or wool blends, creating a sophisticated yet relaxed aesthetic. Don’t shy away from bolder color combinations; burgundy complements patterned socks and earth-toned jackets beautifully. They strike a perfect balance between formality and casualness, making them suitable for business-casual settings or weekend outings. A well-maintained pair of burgundy tassel loafers is a statement piece that reflects confidence and individual style.

Burgundy Chelsea Boots: Modern and Sleek

Burgundy Chelsea boots represent a contemporary twist on a timeless silhouette, offering a sleek and sophisticated aesthetic. Despite occasional website access issues, as indicated by Cloudflare’s Ray ID 9e4898d649aed690 reported on March 30, 2026, affecting resources like lookastic.com, the enduring appeal of this style is clear. Their streamlined design, devoid of laces, creates a clean and modern look that elevates any ensemble.

The rich burgundy hue adds a touch of boldness without being overly ostentatious, making them incredibly versatile. They seamlessly transition from smart-casual to more refined outfits. Consider pairing them with dark wash jeans for a relaxed yet polished vibe, or with tailored chinos for a more sophisticated appearance. Burgundy Chelsea boots are a fantastic choice for those seeking a stylish and comfortable footwear option that exudes confidence and modern sensibility.

Burgundy Chelsea Boots with Jeans

Pairing burgundy Chelsea boots with jeans is a masterclass in effortless style, offering a balance of sophistication and casual comfort. Even with reported website access restrictions, like those encountered on lookastic.com (Ray ID: 9e4898d649aed690, as of March 30, 2026), the popularity of this combination remains undeniable. Opt for dark-wash or indigo jeans to create a harmonious contrast with the rich burgundy hue of the boots.

A slim or straight-leg fit complements the sleek silhouette of the Chelsea boots best, avoiding any overly baggy or oversized proportions. For a smart-casual look, consider a well-fitted denim jacket or a crisp white t-shirt. This pairing works exceptionally well for weekend outings, casual dates, or even a relaxed office environment. Don’t be afraid to experiment with different washes and denim textures to personalize the look and showcase your individual style.

Burgundy Chelsea Boots for a Smart-Casual Look

Elevating your style with burgundy Chelsea boots for a smart-casual ensemble is surprisingly easy, despite potential website access issues reported on platforms like lookastic.com (Ray ID: 9e4898d649aed690, noted on March 30, 2026). Pair these boots with chinos in shades of navy, grey, or even olive green for a sophisticated yet relaxed vibe. A well-structured blazer or a cardigan layered over a button-down shirt instantly elevates the look, creating a polished impression.

Consider incorporating subtle patterns, like a fine-wale corduroy or a textured knit, to add visual interest. Avoid overly formal attire, such as full suits, to maintain the smart-casual balance. This combination is ideal for business-casual offices, weekend brunches, or evening events where a refined yet approachable aesthetic is desired. Remember, confidence is key to pulling off any look!

Burgundy Dress Boots: Versatile Elegance

Burgundy dress boots represent a fantastic bridge between formal and casual wear, offering a sophisticated alternative to traditional black or brown options. Despite reported access issues on style guides like lookastic.com (Ray ID: 9e4898d649aed690, as of March 30, 2026), the inherent versatility of this footwear remains undeniable. These boots excel in situations demanding a polished appearance without the rigidity of oxfords.

The key lies in selecting the right material and pairing them thoughtfully. Leather dress boots lean towards formality, while suede offers a more relaxed aesthetic. They pair exceptionally well with tailored trousers and smart separates, creating a balanced and refined silhouette; Don’t shy away from experimenting with textures and colors to express your individual style, always keeping proportions in mind for a harmonious look.

Burgundy Leather Dress Boots and Chinos

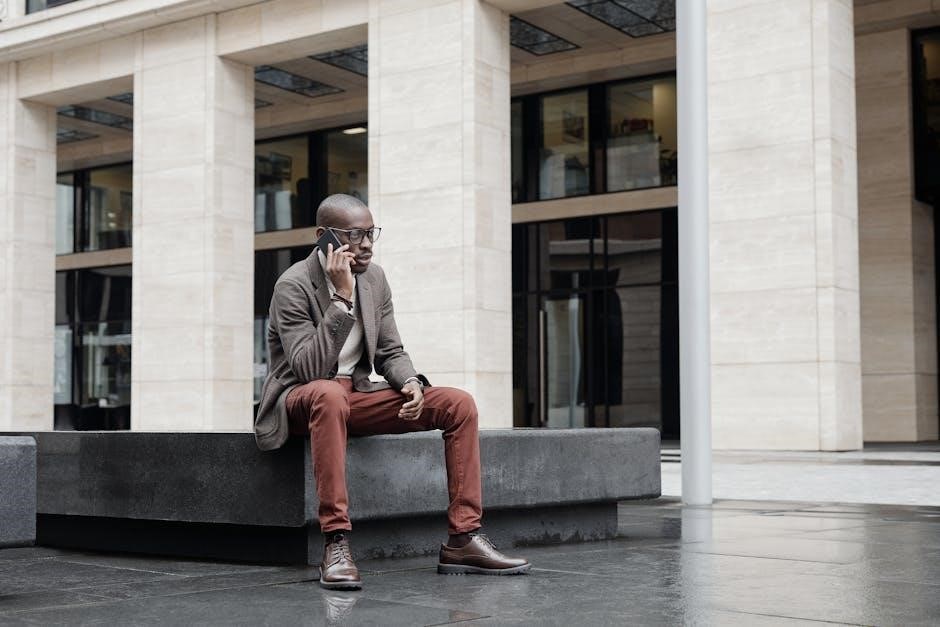
The combination of burgundy leather dress boots and chinos is a masterclass in smart-casual styling, offering a refined yet approachable aesthetic. Despite potential website access restrictions (as noted on lookastic.com with Ray ID 9e4898d649aed690 on March 30, 2026), this pairing consistently delivers a sophisticated look. Opt for chinos in shades of navy, grey, or even olive green to complement the rich burgundy hue.

A well-fitted, neutral-colored sweater or a crisp button-down shirt completes the ensemble. Consider a subtle texture in your upper layers – a cable-knit sweater or a chambray shirt – to add visual interest. Remember to pay attention to the details; a leather belt that echoes the boot’s color ties the outfit together seamlessly, elevating the overall impression of intentional style and polished refinement.

Burgundy Suede Dress Boots and Flannel

Embrace a ruggedly refined aesthetic by pairing burgundy suede dress boots with a flannel shirt. While accessing style guides might present challenges (as indicated by lookastic.com’s restrictions – Ray ID 9e4898d649aed690, March 30, 2026), this combination remains a timeless fall and winter staple. Choose a flannel in complementary earth tones like forest green, charcoal grey, or a muted brown to harmonize with the burgundy boots.

Dark wash denim or corduroy pants provide a solid foundation for this look. Layer a quilted jacket or a waxed cotton coat for added warmth and texture. Don’t shy away from accessorizing with a beanie or a leather watch strap. The key is to balance the softness of the suede with the casual texture of the flannel, creating a look that’s both comfortable and effortlessly stylish.

Burgundy Sneakers: Casual Cool

Burgundy sneakers inject a sophisticated pop of color into relaxed, everyday outfits. Despite potential website access issues (like those reported on lookastic.com with Ray ID 9e4898d649aed690 on March 30, 2026), the versatility of burgundy remains undeniable; These aren’t your typical athletic shoes; they elevate casual wear with a touch of refined style.

Pair them with chinos or dark-wash jeans for a balanced look. A simple white t-shirt or a lightweight henley complements the burgundy hue without overpowering it. For added layers, consider a denim jacket or a bomber. Burgundy sneakers work surprisingly well with neutral tones like grey, navy, and olive green. Embrace the casual vibe, but pay attention to fit and quality to maintain a polished appearance. They’re a modern, comfortable choice.

Styling Burgundy Sneakers with Shorts

Burgundy sneakers paired with shorts create a relaxed yet stylish warm-weather ensemble. While accessing style guides might present challenges (as noted on lookastic.com, Ray ID 9e4898d649aed690, March 30, 2026), the core principles of color coordination remain constant. Opt for shorts in neutral shades like khaki, navy, or grey to allow the burgundy sneakers to stand out as the focal point.

A crisp white t-shirt or a lightweight linen shirt works exceptionally well. Avoid overly busy patterns that clash with the shoe’s color; Roll the shorts’ hems for a more contemporary look. Consider adding a baseball cap or a woven belt to complete the outfit. This combination is perfect for casual outings, weekend adventures, or simply enjoying the sunshine. Remember, confidence is key to pulling off any style!

Burgundy Sneakers with Joggers and a T-shirt

Combining burgundy sneakers with joggers and a t-shirt delivers a supremely comfortable and effortlessly cool aesthetic. Despite potential website access issues (as indicated by lookastic.com’s Cloudflare restrictions, Ray ID 9e4898d649aed690, observed on March 30, 2026), the fundamentals of casual styling endure. Choose joggers in shades of grey, black, or navy to complement the burgundy sneakers without overwhelming the look.

A simple white, black, or heather grey t-shirt provides a clean foundation. Layering with a denim jacket or a bomber jacket adds dimension and warmth. Accessorize with a minimalist watch and a baseball cap for a sporty vibe. This outfit is ideal for running errands, casual hangouts, or a relaxed weekend. Prioritize fit – well-fitting joggers and a t-shirt elevate the entire ensemble.

Color Combinations with Burgundy Shoes

Burgundy’s rich hue offers surprising versatility when paired with various colors, despite potential online resource limitations (as noted by lookastic.com’s access restrictions, Ray ID 9e4898d649aed690, on March 30, 2026). Navy blue creates a classic and sophisticated combination, offering a harmonious balance between boldness and restraint. Grey, particularly charcoal or light grey, provides a modern and understated look, allowing the burgundy shoes to stand out.

Olive green complements burgundy beautifully, evoking a sense of earthy sophistication. Khaki and beige offer a lighter, more casual pairing, perfect for warmer weather. Avoid overly bright or clashing colors, as they can detract from the burgundy’s elegance. Remember that texture plays a role; consider incorporating different fabrics to add depth to your outfit;

Burgundy Shoes with Navy Blue

The pairing of burgundy shoes with navy blue clothing represents a cornerstone of classic menswear, offering a sophisticated and versatile aesthetic. This combination works exceptionally well across various styles, from smart-casual to more formal ensembles, despite potential website access issues reported on March 30, 2026 (lookastic.com, Ray ID 9e4898d649aed690).

Consider navy chinos or trousers paired with a burgundy leather Oxford or a suede loafer for a refined yet relaxed look. A navy blazer with burgundy Chelsea boots elevates the outfit for business casual settings; For a bolder statement, try a navy suit with burgundy dress shoes, ensuring the shades complement each other. Don’t be afraid to experiment with textures – a navy knit sweater with burgundy suede boots creates a stylish contrast.

Burgundy Shoes with Grey

Burgundy shoes and grey clothing create a harmonious and modern pairing, offering a sophisticated alternative to more traditional color combinations. The versatility of grey allows burgundy to truly shine, providing a subtle yet impactful contrast, even with reported website access issues as of March 30, 2026 (lookastic.com, Ray ID 9e4898d649aed690).

Light grey trousers or chinos paired with burgundy loafers or dress boots offer a smart-casual aesthetic. A charcoal grey suit with burgundy Oxfords presents a more formal, yet stylish, option. For a relaxed look, consider grey joggers with burgundy sneakers. Experiment with different shades of grey – from light heather grey to dark charcoal – to find the perfect balance with your burgundy footwear. This pairing works exceptionally well with textured grey fabrics like flannel or tweed.

Caring for Your Burgundy Shoes

Maintaining the rich color and extending the life of your burgundy shoes requires consistent care, despite current website accessibility challenges reported on March 30, 2026 (lookastic.com, Ray ID 9e4898d649aed690). Regular cleaning is paramount; remove dirt and debris after each wear with a soft brush or cloth.

For leather burgundy shoes, condition them monthly to prevent cracking and maintain suppleness. Suede requires a suede brush and protector spray to guard against water and stains. Avoid harsh chemicals and excessive exposure to direct sunlight. Store your burgundy shoes in a cool, dry place, ideally with shoe trees to retain their shape. Promptly address scuffs and scratches with a color-matched polish or repair kit. Proper care ensures your burgundy shoes remain a stylish staple for years to come.

fcp shortcuts pdf

FCP Euro Parts Catalog & Shortcuts: A Comprehensive Guide (Updated 03/24/2026)

FCP Euro provides access to over 100,000 parts for Volvo, BMW, Porsche, and Volkswagen, alongside a Lifetime Replacement Guarantee, free shipping, and 365-day returns.

FCP Euro has evolved significantly since its humble beginnings in 1986 as a local brick-and-mortar auto parts store in Groton, Connecticut. Founded by Harry and Kathy Bauer, the company initially focused on serving the Volvo and BMW parts needs of the surrounding community. Over the decades, FCP Euro strategically expanded its offerings and reach, transforming into a leading online retailer of European car parts.

Today, FCP Euro boasts an extensive catalog exceeding 100,000 Genuine, OEM, aftermarket, and performance parts, catering to Volvo, BMW, Porsche, and Volkswagen vehicles from model years 1960 to the present. They proudly serve the North American market, offering components from renowned brands like Sachs, Lemforder, SKF, and Brembo. With facilities in Connecticut and Mesa, Arizona, FCP Euro provides both online convenience and local pick-up options, solidifying its commitment to customer satisfaction.

What is FCP Euro? ⸺ Company Overview

FCP Euro is a premier online retailer specializing in European automotive parts. Established in 1986, the company has grown from a local Connecticut store to a nationwide supplier, serving enthusiasts and professionals alike. They focus on providing a comprehensive inventory for Volvo, BMW, Porsche, and Volkswagen vehicles, spanning models from 1960 to current production.

FCP Euro distinguishes itself through a commitment to quality and customer service. They offer Genuine, OEM, and high-quality aftermarket parts, sourced from trusted manufacturers like Bosch, Valeo, and Zimmerman. Beyond parts sales, FCP Euro is renowned for its unique benefits, including a Lifetime Replacement Guarantee, free shipping on qualifying orders, and an unlimited 365-day return policy. With strategically located facilities, they efficiently serve customers across the United States.

FCP Euro’s History: From Local Store to Online Giant (Founded 1986)

FCP Euro began as a brick-and-mortar auto parts store in Groton, Connecticut, founded by Harry and Kathy Bauer in 1986. Initially, the business catered to the local Volvo and BMW markets, building a reputation for knowledgeable service and a growing parts inventory. Recognizing the potential for broader reach, FCP Euro strategically transitioned to an online retail model.

This shift allowed them to expand their customer base nationally and internationally, offering an extensive catalog of European car parts. Over the decades, FCP Euro has continually invested in its infrastructure, including a modern warehouse in Mesa, Arizona, to improve shipping times and service the Western US. Their dedication to customer satisfaction, exemplified by the Lifetime Replacement Guarantee, has fueled their growth and solidified their position as a leading supplier in the European automotive parts industry.

Navigating the FCP Euro Website

FCP Euro’s user-friendly website features intuitive parts searching, vehicle selection tools, and detailed product information, ensuring a seamless shopping experience for enthusiasts.

FCP Euro Website Interface: Key Sections

FCP Euro’s website is meticulously designed for ease of navigation, offering several key sections to streamline the parts-finding process. The homepage prominently features a vehicle selector, allowing users to quickly input their make, model, and year for tailored results. A robust search bar enables direct part number or keyword searches, ideal for those with specific needs.

Dedicated sections showcase parts categorized by vehicle brand – Volvo, BMW, Porsche, and Volkswagen – each leading to further subcategories like engine, brakes, suspension, and interior. The “My Account” area provides order history, saved vehicles, and address management.

Furthermore, FCP Euro integrates helpful resources such as technical articles, installation guides, and a blog covering automotive maintenance and repair; The website also clearly displays their unique selling points: the Lifetime Replacement Guarantee, free shipping details, and the generous 365-day return policy, fostering customer confidence and satisfaction.

Vehicle Selection Process: Ensuring Correct Parts

FCP Euro prioritizes accurate parts matching through a detailed vehicle selection process. Users begin by choosing their vehicle’s make – Volvo, BMW, Porsche, or Volkswagen. Subsequently, they input the specific model and year of manufacture. For enhanced precision, entering the Vehicle Identification Number (VIN) is strongly recommended.

VIN decoding automatically populates vehicle specifics, eliminating potential errors associated with manual selection. This ensures compatibility, particularly crucial for components like brakes, suspension parts, and engine components. The system then displays parts specifically engineered for that vehicle configuration.

FCP Euro’s system accounts for regional variations and trim levels, further refining the search. Saving vehicle profiles within “My Account” allows for quick access to previously selected vehicles, simplifying future purchases and minimizing the risk of ordering incorrect parts. This meticulous approach guarantees a seamless and accurate shopping experience.

Using the FCP Euro Parts Search Function

FCP Euro’s parts search function offers multiple avenues for locating desired components. Users can initiate searches by keyword – for example, “brake pads” or “oil filter”. Alternatively, browsing through categorized parts sections, such as “Engine” or “Suspension”, provides a structured approach. The advanced search allows filtering by brand (Sachs, Brembo, Bosch, etc.), price range, and parts type (Genuine, OEM, Aftermarket).

Utilizing part numbers directly yields precise results, bypassing potential ambiguity. The search function intelligently suggests related parts and offers cross-referencing, aiding in identifying compatible alternatives. Detailed parts diagrams and exploded views are frequently available, visually clarifying component locations and relationships.

Search results display comprehensive information, including pricing, availability, and estimated shipping times. Each part listing includes detailed descriptions and compatibility notes, ensuring informed purchasing decisions. FCP Euro continually refines its search algorithm to deliver increasingly relevant and accurate results.

FCP Euro Parts Categories

FCP Euro specializes in Volvo, BMW, Porsche, and Volkswagen parts, offering Genuine, OEM, and aftermarket options for a wide range of vehicle needs.

Volvo Parts at FCP Euro: Model Years 1960 ⏤ Current

FCP Euro boasts an extensive Volvo parts catalog, servicing all North American models from the classic vehicles of 1960 through to the latest releases. Customers can find over 100,000 Genuine, OE, OEM, high-quality aftermarket, and performance parts, including brands like Sachs, Lemforder, SKF, Hutchinson, Zimmerman, Brembo, Valeo, Denso, and Bosch.

Whether you’re maintaining a vintage Volvo or upgrading a modern one, FCP Euro provides a comprehensive selection. This includes everything from essential maintenance items like filters and fluids to more complex components such as engine parts and suspension systems. The company’s commitment to quality ensures that Volvo owners have access to reliable parts for any repair or restoration project. Local customers in Connecticut can also benefit from savings by utilizing the convenient Pick-Up Center.

BMW Parts: Extensive Selection & Availability

FCP Euro is renowned for its vast inventory of in-stock OE, OEM, Genuine, Performance, and Aftermarket BMW parts, catering to all top-selling categories. BMW owners consistently choose FCP Euro as their primary online destination for parts procurement, appreciating the breadth and depth of the catalog.

From routine maintenance components to specialized performance upgrades, FCP Euro offers a solution for every BMW repair and modification need. The selection encompasses everything from brake systems and engine components to interior accessories and electrical parts. Backed by a Lifetime Replacement Guarantee, free shipping, and unlimited 365-day returns, customers can shop with confidence. FCP Euro’s dedication to providing quality BMW parts and exceptional customer service sets it apart in the automotive aftermarket.

Porsche Parts: Genuine, OEM & Aftermarket Options

FCP Euro boasts a wide selection of Porsche parts, encompassing Genuine Porsche components, Original Equipment Manufacturer (OEM) parts, and high-quality aftermarket alternatives. This diverse inventory caters to a broad spectrum of Porsche models, ensuring enthusiasts and mechanics alike can find the parts they need.

Whether you’re maintaining a classic 911 or upgrading a modern Cayenne, FCP Euro provides everything from complete brake kits to intricate engine timing chain kits. The commitment to quality extends to every part offered, backed by the company’s renowned Lifetime Replacement Guarantee, free shipping options, and a generous 365-day return policy. FCP Euro simplifies the Porsche parts shopping experience, delivering reliability and peace of mind with every order.

Volkswagen Parts: OEM & Aftermarket Components

FCP Euro delivers a comprehensive selection of Volkswagen parts, catering to both restoration projects and routine maintenance. Their catalog features both OEM Volkswagen parts – directly sourced from the manufacturer – and a robust range of aftermarket components, offering flexibility and cost-effective solutions for owners.

You’ll find everything needed to keep your VW running smoothly, from essential engine parts and comfortable interior components to complete brake and suspension kits. FCP Euro’s commitment to quality is unwavering, and all parts are supported by their industry-leading Lifetime Replacement Guarantee, alongside free shipping and an expansive 365-day return window. This dedication ensures a seamless and trustworthy experience when sourcing Volkswagen parts online.

FCP Euro’s Unique Selling Points

FCP Euro distinguishes itself with a Lifetime Replacement Guarantee, complimentary shipping, and unlimited 365-day returns, fostering customer confidence and satisfaction.

Lifetime Replacement Guarantee (LRG): Details & Exceptions

FCP Euro’s Lifetime Replacement Guarantee (LRG) is a cornerstone of their customer commitment, offering unparalleled peace of mind. This guarantee covers any part they sell for as long as you own your vehicle, eliminating future replacement costs. However, the LRG isn’t entirely without stipulations. It applies to parts installed on vehicles for personal, non-commercial use.

Parts used in racing, competitive events, or vehicles modified beyond factory specifications are generally excluded. Additionally, the LRG doesn’t cover damage resulting from improper installation, accidents, or normal wear and tear. Core charges are refunded upon the return of the original core, and shipping costs for replacements are typically the responsibility of the customer, though exceptions may apply. Detailed articles are available on the FCP Euro website clarifying the terms, advantages, and specific exclusions of the LRG policy, ensuring transparency and a clear understanding for all customers.

Free Shipping Policy: Eligibility & Details

FCP Euro offers free standard shipping on all orders shipped within the contiguous United States. This generous policy applies to a vast majority of parts, regardless of order size, making it incredibly accessible for customers nationwide. However, certain restrictions do apply. Shipments to Alaska, Hawaii, and international destinations are typically subject to shipping charges, calculated at checkout based on weight and location.

Furthermore, oversized or excessively heavy items may also incur additional shipping fees. Customers located near FCP Euro’s Connecticut Pick-Up Center can bypass shipping costs entirely by opting for local pick-up. The free shipping offer excludes expedited shipping options; customers desiring faster delivery will need to select a paid express service. Detailed information regarding shipping zones, rates, and potential exclusions can be found on the FCP Euro website’s shipping policy page, ensuring complete clarity before placing an order.

Unlimited 365-Day Returns: A Customer-Focused Approach

FCP Euro distinguishes itself with an exceptionally customer-friendly return policy, offering unlimited 365-day returns on all parts. This unparalleled benefit provides peace of mind, allowing customers ample time to ensure parts are the correct fit and meet their needs. Unlike many retailers with restrictive return windows, FCP Euro’s policy fosters trust and encourages confident purchasing decisions.

To initiate a return, customers simply need to log into their account and follow the straightforward online return process. While returns are generally accepted for any reason, parts must be in resalable condition. FCP Euro covers the cost of return shipping for incorrect or defective items. This commitment to customer satisfaction, combined with the Lifetime Replacement Guarantee, solidifies FCP Euro’s reputation as a leader in the automotive parts industry, prioritizing a hassle-free experience for every buyer.

FCP Euro Shortcuts & Efficiency Tips

Maximize your shopping experience by utilizing VIN decoding, saving vehicle profiles, and quickly accessing popular parts categories for streamlined purchases.

Quick Access to Popular Parts Categories

FCP Euro streamlines the parts-finding process with direct links to frequently sought-after categories. This feature eliminates extensive browsing, saving valuable time for both professional mechanics and DIY enthusiasts. Popular selections include brake components – encompassing pads, rotors, and lines – essential for maintaining vehicle safety. Suspension parts, like shocks, struts, and control arms, are readily available, ensuring optimal handling and ride comfort.

Engine components, covering filters, belts, and hoses, are easily accessible for routine maintenance or more complex repairs. Interior parts, such as trim pieces and lighting elements, allow for quick cabin upgrades or replacements. Furthermore, dedicated sections for fluids – oils, coolants, and brake fluids – simplify essential upkeep. By prioritizing these high-demand categories, FCP Euro enhances user efficiency and promotes a seamless online shopping experience, making parts acquisition swift and straightforward.

Utilizing VIN Decoding for Accurate Results

FCP Euro emphasizes the importance of Vehicle Identification Number (VIN) decoding for pinpoint accuracy when selecting parts. Inputting your VIN guarantees compatibility, preventing frustrating errors and ensuring the correct components for your specific vehicle. This feature is particularly crucial given the variations within model years and trim levels. The VIN decoder instantly identifies your car’s exact configuration, eliminating guesswork and potential fitment issues.

By leveraging VIN decoding, customers avoid ordering incorrect parts, saving time and return shipping costs. It’s a simple yet powerful tool that minimizes the risk of incompatibility, especially when dealing with complex systems like engine management or braking. FCP Euro’s system cross-references the VIN with its extensive database, providing a tailored parts list specific to your vehicle’s build. This commitment to precision underscores FCP Euro’s dedication to customer satisfaction and a hassle-free shopping experience.

Saving Vehicle Profiles for Future Purchases

FCP Euro streamlines repeat purchases by allowing customers to save vehicle profiles. This convenient feature stores your car’s details – year, make, model, and VIN – eliminating the need to re-enter this information with each order. Creating a profile significantly reduces shopping time, particularly for those maintaining multiple vehicles or performing ongoing maintenance. It’s a simple step that delivers substantial efficiency gains.

Saved profiles are easily accessible within your FCP Euro account, making future parts searches incredibly fast. This is especially beneficial when ordering frequently replaced items like filters, brake pads, or fluids. Beyond convenience, vehicle profiles enhance accuracy, ensuring you consistently order parts compatible with your specific car. FCP Euro prioritizes a user-friendly experience, and saving vehicle profiles is a prime example of this commitment, fostering customer loyalty and simplifying the parts-buying process.

FCP Euro Locations & Services

FCP Euro operates a Connecticut Pick-Up Center for local savings and a Mesa, Arizona warehouse to efficiently serve customers throughout the Western US region.

Connecticut Pick-Up Center: Local Savings

For customers located in the Northeastern United States, FCP Euro’s Connecticut facility offers a convenient and cost-effective alternative to standard shipping. Established in 1986 in Groton, Connecticut, the original brick-and-mortar store now functions as a dedicated pick-up center.

This allows local enthusiasts and professional mechanics alike to bypass shipping fees entirely, saving both time and money. Simply place your order online, select the “Pick-Up” option during checkout, and collect your parts directly from the Connecticut location.

The Pick-Up Center provides easy access to FCP Euro’s extensive inventory of Genuine, OEM, and aftermarket parts for Volvo, BMW, Porsche, and Volkswagen vehicles. It’s a fantastic option for those needing immediate access to components or preferring a personal touch when acquiring parts. Check the website for current hours of operation and location details.

Mesa, Arizona Warehouse: Western US Service

Expanding its reach across the United States, FCP Euro now boasts a state-of-the-art warehouse facility located in Mesa, Arizona, just southeast of Phoenix. This strategic location is designed to significantly improve service and delivery times for customers throughout the Western US;

The Mesa warehouse mirrors the comprehensive inventory available at the Connecticut headquarters, offering a vast selection of Genuine, OEM, and aftermarket parts for Volvo, BMW, Porsche, and Volkswagen vehicles. This expansion ensures quicker access to critical components, minimizing downtime for repairs and maintenance.

Customers in the Western region can now benefit from reduced shipping costs and faster delivery speeds, making FCP Euro an even more convenient and reliable source for European auto parts. The Arizona warehouse embodies FCP Euro’s commitment to exceptional customer service and nationwide accessibility.

Understanding FCP Euro Parts Types

FCP Euro offers Genuine, OEM, aftermarket, and performance parts, catering to diverse needs and budgets for European vehicle maintenance and upgrades.

Genuine Parts: Direct from the Manufacturer

Genuine parts sourced directly from the vehicle manufacturer – Volvo, BMW, Porsche, or Volkswagen – represent the pinnacle of quality and compatibility. These components are engineered to the exact specifications of your car, ensuring a perfect fit and optimal performance.

Choosing genuine parts guarantees that you’re maintaining your vehicle with the same standard it was originally built with, preserving its integrity and resale value. While often representing a higher initial investment compared to OEM or aftermarket alternatives, genuine parts minimize the risk of compatibility issues and potential long-term problems.

FCP Euro provides a comprehensive selection of genuine parts, backed by their Lifetime Replacement Guarantee, offering peace of mind and long-term value for discerning vehicle owners. This commitment to quality extends across all models and years supported by FCP Euro’s extensive catalog.

OEM Parts: Original Equipment Manufacturer

OEM (Original Equipment Manufacturer) parts are produced by the same manufacturers that supply components directly to the vehicle’s assembly line. They are functionally identical to genuine parts, offering a cost-effective alternative without compromising on quality or fit.

Essentially, you’re receiving the same part that would have been installed on your vehicle originally, but often at a lower price point. This makes OEM parts an excellent choice for repairs and maintenance when seeking a balance between affordability and reliability.

FCP Euro boasts an extensive inventory of OEM parts for Volvo, BMW, Porsche, and Volkswagen, ensuring broad coverage for various models and repair needs. Coupled with FCP Euro’s Lifetime Replacement Guarantee, free shipping, and unlimited returns, OEM parts represent a smart and secure investment for vehicle upkeep.

Aftermarket Parts: Quality Alternatives

Aftermarket parts are manufactured by companies independent of the original vehicle manufacturer. These parts offer a diverse range of options, often at more competitive price points than genuine or OEM alternatives. While not produced by the carmaker, reputable aftermarket manufacturers adhere to stringent quality standards, ensuring reliable performance and durability.

FCP Euro carefully curates its selection of aftermarket parts, partnering with trusted brands like Sachs, Lemforder, SKF, and Brembo to provide customers with high-quality components. These parts cover a wide spectrum of vehicle needs, from routine maintenance items to more complex repair components.

Choosing aftermarket parts from FCP Euro provides a cost-effective solution without sacrificing reliability, all backed by their industry-leading Lifetime Replacement Guarantee, free shipping, and unlimited 365-day returns.

Performance Parts: Enhancing Vehicle Capabilities

Performance parts are designed to improve specific aspects of a vehicle’s operation, such as engine power, handling, or braking. These components go beyond simple replacement, offering upgrades for enthusiasts seeking to optimize their driving experience. FCP Euro recognizes the demand for enhanced performance and provides a curated selection of these specialized parts.

From high-performance brake kits by Brembo to upgraded suspension components from leading manufacturers, FCP Euro caters to drivers who demand more from their vehicles. These parts are sourced from reputable brands known for innovation and quality, ensuring both performance gains and long-term reliability;

Investing in performance parts from FCP Euro is backed by their Lifetime Replacement Guarantee, free shipping, and unlimited 365-day returns, providing peace of mind alongside enhanced vehicle capabilities.

paw patrol casting station instructions

Paw Patrol Casting Station Instructions: A Comprehensive Guide

Today’s date is March 14‚ 2026. This guide details the Magformers Paw Patrol set‚ alongside related items like belly casting kits and various game titles.
It also references medical facilities and dictionaries.

Understanding the Magformers Paw Patrol Set

The Magformers Paw Patrol 20-Piece Pups Away! Set‚ an English edition‚ offers a unique construction experience centered around the beloved characters. This set leverages Magformers’ magnetic building technology‚ allowing for easy assembly and disassembly‚ fostering creativity and problem-solving skills in young builders. It’s more than just a toy; it’s an introduction to basic engineering principles.

The set’s appeal extends beyond simple building. References to related products‚ such as the Belly Casting Kit‚ suggest a broader interest in creative and hands-on activities. The inclusion of game titles like “PAW Patrol The Movie: Adventure City Calls” and “Mighty Pups Save Adventure Bay” highlights the franchise’s multimedia presence and potential for expanded play scenarios.

Furthermore‚ the mention of diverse product ranges – including SMESHARIKI‚ Shimmer and Shine‚ DRAKOSHA TOSHA‚ and even opal glassware – indicates a marketplace filled with options for children’s entertainment and household goods. The set’s availability alongside dictionaries and medical consultation services demonstrates its place within a wider consumer landscape.

What is a Casting Station?

Within the context of the Magformers Paw Patrol set‚ a “casting station” isn’t a traditional mold-making setup like the referenced Belly Casting Kit. Instead‚ it’s a conceptual space – real or imagined – where the Paw Patrol characters and their vehicles are constructed using the magnetic building pieces. It’s a zone dedicated to bringing Adventure Bay to life through creative assembly.

Considering the broader information available‚ the term “casting” subtly links to the idea of shaping and forming‚ mirroring the process of creating something new. This parallels the set’s function: taking individual magnetic shapes and “casting” them into recognizable forms – Ryder’s ATV‚ Chase’s cruiser‚ and so on.

The references to game titles and diverse product categories suggest a world where imagination and play are paramount. The casting station‚ therefore‚ becomes a hub for storytelling and role-playing‚ fueled by the child’s creativity; It’s a place where the Paw Patrol team is repeatedly “cast” into new adventures‚ limited only by the builder’s imagination‚ much like selecting games for a PS5.

Components of the Paw Patrol Casting Station

The “casting station” itself isn’t a single physical component‚ but rather the arrangement of the 20-piece Magformers Paw Patrol set. Core components include various geometric magnetic shapes – triangles‚ squares‚ and potentially specialized pieces designed to resemble vehicle parts. These pieces‚ like those found in broader toy ranges (referenced by “Warm baby 300mnoe” and other listings)‚ are the building blocks.

While the provided text doesn’t detail a specific parts list‚ we can infer the inclusion of pieces to construct the main characters and their vehicles. The set aims to replicate elements from “PAW Patrol The Movie: Adventure City Calls” and “Mighty Pups Save Adventure Bay‚” suggesting pieces for corresponding vehicles and character details.

Beyond the magnetic forms‚ the station conceptually requires a flat surface for building. The references to dictionaries and medical facilities are tangential‚ but highlight a world filled with diverse objects. The essential components are the magnetic pieces‚ a builder’s imagination‚ and a space to bring Adventure Bay to life‚ mirroring the creative freedom offered by PSN game accounts.

Setting Up the Casting Station

Establishing the “casting station” – your Paw Patrol construction zone – is remarkably simple. Begin by selecting a flat‚ stable surface. A table or floor space works well‚ ensuring ample room for building and recreating Adventure Bay. No specialized tools are required‚ aligning with the ease of accessing PSN game accounts mentioned in the provided text.

Unpack the 20-piece Magformers set and familiarize yourself with the various magnetic shapes. While a formal instruction manual isn’t detailed in the source material‚ experimentation is key. Consider organizing the pieces by color or shape to streamline the building process‚ similar to categorizing terms in a meteorological dictionary.

The setup isn’t rigid; it’s a flexible creative space. The references to medical facilities and glassware suggest a broader world of organization‚ but here‚ the focus is on intuitive construction. Ensure good lighting to clearly see the magnetic connections. Prepare for imaginative play‚ mirroring the adventure found in “PAW Patrol The Movie: Adventure City Calls.”

Assembling the Paw Patrol Characters

Constructing the Paw Patrol pups with the Magformers set relies on magnetic connection and a bit of creative problem-solving. While specific character blueprints aren’t detailed in the provided information – which includes references to game trophies and dictionaries – the core principle is utilizing the shapes to approximate each pup’s form. Think about basic geometric forms: cubes for bodies‚ triangles for ears‚ and cylinders for legs.

Start with a central magnetic core for the body‚ then attach limbs and head components. The 20-piece set requires resourceful building; don’t expect perfect replicas. Embrace the abstract! Consider the variety of items listed – from toys to kitchenware – as inspiration for shape combinations.

Focus on recognizable features. For Chase‚ perhaps a blue “police cruiser” shaped element on his back. For Marshall‚ a red “fire truck” inspired piece. Remember‚ like accessing PSN accounts‚ building is about adapting and making the most of available resources. The goal is fun‚ imaginative play‚ not precise duplication.

Ryder’s ATV Construction

Building Ryder’s ATV with the Magformers set demands a focus on stability and a vehicle-like structure. Given the limited information – referencing everything from game trophies to meteorological dictionaries – we must extrapolate from the core building principles. Begin with a rectangular base‚ utilizing larger square or rectangular Magformers pieces to form the ATV’s chassis.

Add wheels using circular components‚ ensuring they rotate (or appear to) with secure magnetic connections. The ATV’s handlebars can be constructed from angled pieces‚ creating a recognizable steering mechanism. Consider incorporating triangular shapes to suggest a streamlined‚ off-road design.

Remember the broader context of the provided data – including mentions of medical consultations and Japanese hospital listings – suggests a need for precision and careful assembly. Like choosing the right PSN game‚ select pieces that fit logically and create a robust vehicle. The ATV doesn’t need to be perfect‚ but it should resemble a functional all-terrain vehicle.

Chase’s Police Cruiser Build

Constructing Chase’s Police Cruiser requires a focus on a robust‚ rectangular form‚ mirroring the vehicle’s iconic shape. Considering the diverse data provided – from belly casting kits to meteorological terms – we’ll prioritize structural integrity. Begin with a solid base using larger Magformers pieces‚ establishing the cruiser’s main body.

Add wheels‚ ensuring they’re securely attached for “rolling” action. Utilize blue Magformers pieces to accurately represent Chase’s cruiser’s color scheme. Incorporate angled pieces to create the windshield and roof‚ aiming for a sleek‚ police-vehicle aesthetic. Don’t forget details like a light bar – potentially constructed from smaller‚ rectangular pieces.

The references to game trophies and Japanese medical facilities highlight the importance of meticulous construction. Like selecting a PSN game‚ choose pieces that fit seamlessly. The cruiser should be instantly recognizable as Chase’s vehicle‚ embodying both form and function. Remember‚ even a simplified build should capture the essence of the police cruiser.

Marshall’s Fire Truck Assembly

Assembling Marshall’s Fire Truck demands a focus on height and a ladder extension‚ reflecting its crucial firefighting role. Considering the varied information – from PAW Patrol movie details to meteorological dictionaries – stability is paramount. Begin with a sturdy‚ rectangular base using larger Magformers‚ forming the truck’s cab and body.

Utilize red Magformers extensively to accurately depict Marshall’s vehicle. Construct a tall tower at the rear to represent the ladder‚ employing angled pieces for a realistic incline. Ensure the ladder can extend and retract‚ mimicking functionality. Add wheels‚ prioritizing secure attachment for maneuverability.

The references to Japanese hospitals and game rentals emphasize precision. Like choosing a specific game‚ select pieces that connect firmly. The truck should be instantly recognizable‚ embodying both the vehicle’s form and its life-saving purpose. Consider adding smaller details‚ like lights‚ to enhance realism. A robust build is key‚ mirroring the truck’s essential role.

Skye’s Helicopter Creation

Constructing Skye’s helicopter requires an emphasis on aerodynamic form and vibrant color‚ mirroring her aerial expertise. Considering the diverse references – from casting kits to game trophies – a lightweight yet stable design is crucial. Begin with a central‚ elongated Magformers structure forming the helicopter’s fuselage.

Utilize primarily pink and white Magformers to accurately represent Skye’s signature vehicle. Attach rotor blades using connector pieces‚ ensuring they can spin freely. Create a cockpit area‚ providing a space for Skye’s figure. Add a tail section for stability and directional control‚ employing angled pieces for a realistic shape.

The mentions of dictionaries and medical facilities highlight the need for meticulous detail. Like selecting the right word or specialist‚ choose pieces that connect seamlessly. The helicopter should be instantly recognizable‚ embodying both its form and Skye’s airborne agility. Consider adding landing skids for stability when grounded. A balanced build is essential‚ reflecting the helicopter’s flight capabilities.

Rocky’s Recycling Truck Construction

Rocky’s Recycling Truck demands a robust and functional build‚ reflecting his dedication to environmental responsibility. Referencing the provided data – encompassing game lists and even medical resources – emphasizes the importance of a well-structured‚ reliable design. Begin with a sturdy‚ rectangular base using Magformers‚ forming the truck’s chassis.

Employ primarily green and grey Magformers to accurately depict Rocky’s vehicle. Construct a large‚ open-top container at the rear‚ representing the recycling bin. Utilize connector pieces to create a functional lifting mechanism‚ simulating the truck’s ability to collect and compact recyclables. Add a cab area for Rocky’s figure‚ ensuring sufficient space and visibility.

The inclusion of dictionary references suggests precision is key. Like defining a term‚ each component must fit perfectly. Incorporate smaller Magformers to detail the truck’s features‚ such as wheels‚ lights‚ and warning signals. A durable build is paramount‚ mirroring Rocky’s commitment to handling all sorts of waste. Ensure the recycling bin is easily accessible for imaginative play.

Zuma’s Hovercraft Build

Constructing Zuma’s Hovercraft requires a focus on aerodynamic design and stability‚ mirroring his aquatic rescue expertise. Considering the provided data – including game trophies and hospital listings – highlights the need for a resilient and adaptable build. Begin with a broad‚ flat base using Magformers‚ establishing the hovercraft’s platform.

Utilize primarily blue and orange Magformers to accurately represent Zuma’s vehicle. Build a central fan housing‚ suggesting the powerful propulsion system. Employ connector pieces to create a smooth‚ rounded shape‚ minimizing drag and maximizing speed. Add a cockpit area for Zuma’s figure‚ ensuring clear visibility and easy access.

The reference to dictionaries implies attention to detail. Each connection must be precise‚ like defining a technical specification. Incorporate smaller Magformers to detail the hovercraft’s features‚ such as rudders‚ lights‚ and rescue equipment. A stable build is crucial‚ reflecting Zuma’s ability to navigate challenging waters. Ensure the craft can “hover” effectively on a smooth surface‚ encouraging imaginative play.

Rubble’s Bulldozer Assembly

Assembling Rubble’s Bulldozer demands a robust and powerful construction‚ reflecting his role as the construction pup. The provided information‚ encompassing game details and medical resources‚ underscores the importance of a durable and reliable build. Start with a strong‚ rectangular chassis using Magformers‚ forming the bulldozer’s core.

Employ predominantly yellow and black Magformers to accurately depict Rubble’s vehicle. Construct a large‚ imposing blade at the front‚ utilizing multiple Magformers to create a solid‚ pushing surface. Integrate connector pieces to ensure the blade is securely attached and can withstand simulated digging and clearing operations.

The mention of meteorological terms suggests a need for structural integrity‚ capable of withstanding various “weather” conditions during play. Add a detailed cabin for Rubble’s figure‚ providing a secure and visible command center. Reinforce the chassis with additional Magformers‚ ensuring stability and preventing collapse under pressure. A functional‚ heavy-duty design is key‚ mirroring Rubble’s strength and determination.

Everest’s Snowmobile Construction

Constructing Everest’s snowmobile requires a sleek and agile design‚ reflecting her expertise in snowy rescues. Considering the provided data – encompassing game trophies and medical appointment details – emphasizes the need for a swift and dependable vehicle. Begin with a streamlined chassis using primarily white and light blue Magformers‚ capturing the snowmobile’s icy aesthetic.

Focus on creating a low profile‚ enhancing the vehicle’s speed and maneuverability. Utilize curved Magformers to achieve a dynamic‚ aerodynamic shape. Integrate sturdy tracks using connector pieces‚ ensuring a secure grip on simulated snowy terrain. The reference to dictionaries suggests precision in construction‚ mirroring Everest’s careful navigation.

Add a comfortable seat for Everest’s figure and a small windscreen for protection against the elements. Reinforce the chassis with additional Magformers‚ ensuring stability during high-speed runs. A functional and visually appealing design is crucial‚ embodying Everest’s adventurous spirit and resilience in challenging conditions.

Tracker’s Jungle Cruiser Build

Building Tracker’s Jungle Cruiser demands a robust and adaptable vehicle‚ mirroring his rainforest expertise. The provided information‚ including references to game titles and medical services‚ highlights the need for a reliable and versatile machine capable of navigating diverse terrains. Begin with a sturdy‚ rectangular base using primarily green and brown Magformers‚ reflecting the jungle environment.

Prioritize large‚ all-terrain wheels constructed from connected Magformers‚ ensuring optimal traction on uneven surfaces. Incorporate a raised chassis for navigating obstacles like rocks and fallen logs. The mention of dictionaries suggests attention to detail‚ crucial for replicating the jungle’s complexity. Add a spacious cargo area for carrying essential rescue equipment.

Include a comfortable seat for Tracker’s figure and a protective roll cage for added safety. Reinforce the structure with additional Magformers‚ ensuring durability during challenging expeditions. A functional and visually appealing design is paramount‚ embodying Tracker’s adventurous spirit and resourcefulness in the rainforest.

Advanced Building Techniques

Mastering the Paw Patrol Casting Station requires moving beyond basic connections. The referenced dictionaries and medical listings imply a need for precision and systematic approaches. Explore utilizing angled Magformers to create dynamic vehicle shapes‚ enhancing realism and aerodynamic profiles. Implement internal bracing techniques‚ reinforcing structures for increased stability during play – mirroring the robustness needed for rescue missions.

Experiment with layering Magformers to construct complex details like headlights‚ bumpers‚ and intricate vehicle panels. Consider incorporating rotating elements‚ such as turrets or adjustable ladders‚ using carefully balanced connections. The game titles mentioned suggest dynamic action‚ so prioritize functionality.

Challenge yourself to build without relying solely on pre-defined connection points‚ fostering creativity and problem-solving skills. Utilize magnetic polarity to your advantage‚ creating secure and unconventional attachments. Finally‚ document your builds‚ referencing the provided information as inspiration for innovative designs and advanced construction methods.

Troubleshooting Common Issues

Despite careful assembly‚ challenges can arise with the Paw Patrol Casting Station. Weak connections are frequent; ensure Magformers ‘click’ securely‚ referencing the precision implied by the medical facility listings. If pieces detach during play‚ double-check alignment and magnetic polarity. The dictionary references suggest clarity is key – examine connection points for obstructions.

Structural instability‚ particularly in taller builds‚ can be addressed with internal bracing. Refer to advanced building techniques for reinforcement strategies. Difficulty assembling specific characters may stem from incorrect piece orientation; consult the original set’s instructions (if available).

If pieces are missing‚ explore replacement part options (detailed later). The game titles hint at fast-paced action; ensure builds can withstand energetic play. Finally‚ if encountering persistent issues‚ a systematic approach – akin to medical diagnosis – is recommended. Document the problem‚ retrace steps‚ and seek online resources for solutions.

Cleaning and Maintenance

Maintaining your Paw Patrol Casting Station ensures longevity and hygienic play. Regularly wipe down Magformers pieces with a soft‚ damp cloth. Avoid abrasive cleaners‚ mirroring the care suggested for opal glassware and porcelain ware mentioned in related product listings. Stubborn dirt can be removed with mild soapy water‚ ensuring thorough rinsing and drying.

Inspect connections frequently for debris accumulation‚ referencing the precision needed in medical consultations. This prevents weakened magnetic bonds. Store the set in a clean‚ dry location‚ away from direct sunlight and extreme temperatures – similar to preserving archival documents like meteorological dictionaries.

Periodically check for any damage to the plastic components. While Magformers are durable‚ energetic play (like the action in ‘Adventure City Calls’) can cause wear and tear. Promptly address any cracks or breaks to prevent further damage. Proper storage‚ akin to organizing a comprehensive product range‚ will maximize the set’s lifespan.

Where to Find Replacement Parts

Locating replacement parts for your Paw Patrol Casting Station is crucial for continued building fun. Begin by checking the original packaging for contact information for Magformers customer support. Many online retailers‚ similar to those listing the ‘Pups Away!’ set‚ also offer individual components or smaller packs.

Explore online marketplaces; however‚ verify seller credibility before purchasing‚ mirroring the caution needed when selecting medical facilities. Search using specific part names or set numbers to refine your results. Consider joining online Paw Patrol fan communities – members often trade or sell spare parts.

If a piece is significantly damaged‚ contacting Magformers directly is often the best course of action. They may offer replacement parts for a fee‚ or direct you to authorized distributors. Remember to have your set’s details readily available‚ much like providing information during a consultation. Be aware of potential shipping costs‚ comparable to game rental fees.

tacoma parts diagram pdf

Tacoma parts diagrams, often found as PDF files, are essential for identifying components during repairs or modifications. These visual guides streamline the process!

What are Tacoma Parts Diagrams?

Tacoma parts diagrams are detailed visual representations of your Toyota Tacoma’s components, showcasing how everything fits together. They’re essentially exploded views, illustrating each part’s location and relationship to others within the vehicle’s systems. These diagrams aren’t just pictures; they’re technical documents crucial for accurate repairs and maintenance.

Typically, each diagram focuses on a specific area – like the engine, transmission, or brake system – and labels each part with a unique identifying number. These numbers correspond to official Toyota part numbers, making ordering replacements straightforward. Finding these diagrams in PDF format is common, offering easy access and portability for mechanics and DIY enthusiasts alike. They are invaluable tools for understanding the complexity of your Tacoma.

Why Use a PDF Format?

PDF (Portable Document Format) is the ideal way to access Tacoma parts diagrams due to its numerous advantages. PDFs ensure consistent formatting across different devices and operating systems, meaning the diagram will look the same on a computer, tablet, or smartphone. This consistency is vital for accurate part identification.

Furthermore, PDFs are easily downloadable and storable, allowing you to keep a comprehensive library of diagrams readily available, even offline. They are also generally smaller in file size compared to other image formats, making them quick to download and share. The format’s security features also prevent accidental alterations, ensuring you’re always working with a reliable and accurate representation of your Tacoma’s parts.

Understanding Tacoma Generations & Diagrams

Tacoma parts diagrams vary significantly between generations (1995-2004, 2005-2015, 2016-Present), necessitating the use of diagrams specific to your truck’s year.

First Generation (1995-2004) Diagrams

For the first-generation Tacoma (1995-2004), locating detailed parts diagrams in PDF format can sometimes present a challenge compared to newer models. However, resources like Toyota Japancats.ru offer access to older catalogs. These diagrams are crucial for identifying specific parts for repairs or restoration projects on these earlier trucks.

Diagrams for this generation often focus on core mechanical components, including engine parts, suspension elements (like tie rod ends – detailed catalogs exist for these), and basic body panels. Expect less granular detail in electrical system schematics compared to later models. When using these diagrams, carefully cross-reference part numbers to ensure compatibility, as revisions occurred throughout the production run. Remember to verify the diagram corresponds to your specific Tacoma’s configuration (2WD or 4WD).

Second Generation (2005-2015) Diagrams

The second-generation Tacoma (2005-2015) benefits from more readily available PDF parts diagrams. Official Toyota parts catalogs and numerous third-party online resources provide comprehensive breakdowns of vehicle systems. These diagrams are particularly useful for identifying components within the transmission & drivetrain, brake systems, and increasingly complex electrical systems.

Notably, detailed ground distribution diagrams, like those available for the 2014 model year, are crucial for electrical troubleshooting. Diagrams for this generation often include connector part number information, aiding in harness repairs. Resources like Toyota Japancats.ru continue to be valuable. Remember to specify your vehicle’s exact year and configuration when searching, as variations exist within this generation.

Third Generation (2016-Present) Diagrams

Finding PDF Tacoma parts diagrams for the third generation (2016-Present) often relies on official Toyota catalogs and expanding online databases. While still developing compared to earlier generations, access is improving. These diagrams are vital for navigating the newer, more technologically advanced systems, including the updated electrical architecture and sophisticated safety features.

Detailed breakdowns of the suspension and steering components, including tie rod end specifics, are available. Accessing diagrams through resources like Toyota Japancats.ru remains a viable option. Accurate identification of parts, aided by precise part numbers, is crucial. Remember to always verify compatibility with your specific model year and trim level.

Key Components & Diagram Sections

Tacoma parts diagrams in PDF format meticulously detail crucial sections: engine, transmission, suspension, brakes, electrical, body, and chassis components for easy repair.

Engine Parts Diagrams

Engine parts diagrams, readily available in PDF format, are incredibly detailed, showcasing every component from the cylinder head to the oil pan. These diagrams are vital for identifying specific parts needed during engine repairs or rebuilds. They illustrate the precise location and relationship of each element, including gaskets, pistons, valves, and the timing chain.

A well-structured diagram will utilize exploded views, clearly labeling each part with a corresponding part number. This allows for accurate ordering and ensures compatibility. Furthermore, these diagrams often categorize parts by engine system – fuel, cooling, lubrication, and ignition – simplifying the identification process. Accessing these PDFs through official Toyota catalogs or reputable online resources like Toyota Japancats.ru provides reliable and accurate information for your Tacoma’s engine.

Transmission & Drivetrain Diagrams

Transmission and drivetrain diagrams, commonly found as PDF documents, are crucial for understanding the complex assembly of your Tacoma’s power transfer system. These diagrams detail components like the transmission itself, driveshaft, differential, and transfer case (for 4WD models). They are invaluable when diagnosing issues or performing maintenance, such as replacing seals, bearings, or gears.

Detailed PDFs will often feature exploded views, clearly illustrating the internal workings and part relationships. Each component is labeled with a unique part number, facilitating accurate identification and ordering. These diagrams are essential for identifying connector part numbers related to sensors within the transmission. Resources like official Toyota parts catalogs and online platforms provide access to these vital diagrams, ensuring accurate repairs and maintaining your Tacoma’s drivetrain performance.

Suspension & Steering Parts Diagrams

Suspension and steering parts diagrams, readily available in PDF format, are indispensable for maintaining ride quality and handling. These diagrams illustrate components like shocks, springs, control arms, ball joints, tie rod ends, and the steering rack. They’re vital for diagnosing noises, uneven tire wear, or steering issues.

Detailed PDFs often showcase exploded views, clearly labeling each part with its corresponding number. Specifically, diagrams highlight tie rod end details, crucial for alignment and steering precision. Accessing these diagrams through Toyota catalogs or online resources like Japancats.ru ensures accurate part identification. These resources are essential for ordering replacements and performing repairs, guaranteeing a safe and properly functioning suspension and steering system on your Tacoma.

Tie Rod End Details

Tie rod end details within Tacoma parts diagrams (often in PDF format) are critically important for steering precision and safety. These diagrams meticulously illustrate the inner and outer tie rod ends, showcasing their construction, including the ball joint, boot, and threaded sections.

Specific PDF catalogs, like the “SUSPENSION & STEERING PARTS CATALOGUE” (Version 01/2005), provide part numbers linked to vehicle models – for example, TACOMA 4WD (VZN170, VZN171, RZN160, RZN161) with part number SE3661R (A01TE10580). Understanding these details allows for accurate replacement, ensuring proper wheel alignment and responsive steering. Accessing these detailed diagrams via official Toyota resources or Japancats;ru is crucial for successful suspension and steering repairs.

Brake System Diagrams

Brake system diagrams, frequently available as PDF downloads, are vital for maintaining the safety and functionality of your Tacoma. These diagrams comprehensively illustrate all brake components – master cylinders, calipers, rotors, drums, lines, and pads – providing a clear visual representation of the entire system.

Parts lists within these PDFs, as seen in documents detailing parts orders from P.O. PRIMAL FOR SUBIC, specify components like brake pads and shoes. Accurate identification relies on these diagrams, ensuring the correct parts are ordered. Utilizing official Toyota catalogs or resources like Toyota Japancats.ru provides access to detailed, model-specific diagrams, crucial for effective brake repairs and maintenance, guaranteeing optimal stopping power.

Electrical System Diagrams

Electrical system diagrams, often distributed as PDF files, are indispensable for diagnosing and repairing the complex wiring of your Tacoma. These diagrams detail the location of every wire, connector, and electrical component, from the battery to the lights and sensors. They are crucial for troubleshooting issues and performing modifications safely.

Specifically, ground distribution diagrams, like those for a 2014 Tacoma, pinpoint grounding points – essential for proper electrical function. Documents listing connector part numbers are also vital, aiding in identifying and replacing damaged connectors. Accessing these diagrams through official Toyota catalogs or resources like Toyota Japancats;ru ensures accuracy and prevents electrical faults, maintaining the vehicle’s electronic systems.

Ground Distribution Diagrams (2014 Example)

Ground distribution diagrams, exemplified by those for the 2014 Toyota Tacoma, are critical PDF resources for electrical troubleshooting. These diagrams meticulously map all grounding points within the vehicle’s electrical system. Proper grounding is fundamental for reliable operation, preventing erratic behavior and potential damage to sensitive electronic components.

Locating these diagrams, often within larger electrical system schematics, allows technicians to verify the integrity of each ground connection. A faulty ground can manifest as a multitude of issues, from malfunctioning lights to sensor errors. Utilizing these PDFs, alongside connector part number lists, ensures accurate diagnosis and repair, restoring the Tacoma’s electrical stability and functionality.

Body & Chassis Diagrams

Body and chassis diagrams, available in PDF format, provide a detailed breakdown of the Toyota Tacoma’s structural components. These diagrams are invaluable when undertaking repairs or modifications affecting the vehicle’s frame, panels, or internal structure. They illustrate the precise location and assembly of parts, facilitating accurate restoration or customization.

These PDF resources showcase everything from bumper mounting points to cab reinforcement structures. Accessing these diagrams, often through official Toyota parts catalogs or third-party resources, ensures correct part identification and proper installation. Understanding these diagrams is crucial for maintaining the Tacoma’s structural integrity and ensuring passenger safety, especially after collision repairs.

Where to Find Tacoma Parts Diagrams in PDF

Tacoma parts diagrams in PDF format are accessible through official Toyota catalogs, online resources like Toyota Japancats.ru, and various third-party websites.

Official Toyota Parts Catalogs

Toyota’s official parts catalogs represent the most reliable source for accurate Tacoma parts diagrams in PDF or electronic formats. These catalogs, often subscription-based or available through Toyota dealerships, provide detailed exploded views of every component, ensuring precise identification. They are meticulously maintained and updated to reflect the latest engineering changes and model revisions.

Accessing these catalogs typically requires a paid subscription or a professional account, but the investment is worthwhile for serious enthusiasts or professional mechanics. The diagrams include comprehensive part numbers, supersessions, and compatibility information, minimizing the risk of ordering incorrect parts. While potentially costly, official catalogs guarantee accuracy and completeness, surpassing the reliability of many free online alternatives. They are the gold standard for Tacoma parts identification.

Third-Party Online Resources

Numerous third-party websites offer Tacoma parts diagrams in PDF format, providing accessible alternatives to official Toyota catalogs. These resources often compile information from various sources, including scanned parts manuals and user-submitted diagrams. While convenient and frequently free, users should exercise caution regarding accuracy and completeness.

The quality of diagrams can vary significantly, and some may contain errors or outdated information. It’s crucial to cross-reference part numbers and diagrams with multiple sources before making any purchases. Websites like those offering access to older catalogs or forums dedicated to Tacoma repairs can be valuable, but always verify the data. Remember, relying solely on unofficial sources carries inherent risks; diligent verification is key.

Toyota Japancats.ru

Toyota Japancats.ru is a widely recognized online resource for accessing detailed Toyota parts catalogs, often available for viewing and downloading information relevant to Tacoma models. This platform provides access to exploded views and part numbers, effectively functioning as a digital PDF equivalent for many components.

Users can navigate through vehicle-specific catalogs, searching by model year and component group to locate precise diagrams. While the interface may require some familiarity, it offers a comprehensive database. It’s particularly useful for identifying original equipment manufacturer (OEM) parts. However, note that the site’s functionality and availability can sometimes fluctuate, and a stable internet connection is essential for optimal use.

Using & Interpreting Diagrams

Tacoma parts diagrams utilize specific part numbers for identification, and connector part numbers are crucial for electrical repairs, aiding in accurate component sourcing.

Part Numbers & Identification

Tacoma parts diagrams heavily rely on precise part numbers for accurate identification and ordering. These numbers are unique identifiers assigned by Toyota to each component, ensuring you receive the correct replacement part. Diagrams clearly display these numbers alongside each illustrated part, facilitating easy lookup in official catalogs or online resources like Toyota Japancats.ru.

Understanding the numbering system is key; variations can exist based on the Tacoma generation and specific model year. Cross-referencing with the vehicle’s VIN is often recommended to confirm compatibility. Accurate part number identification minimizes errors, saving time and preventing costly mistakes during repairs or upgrades. Utilizing these diagrams effectively streamlines the parts procurement process, ensuring a successful outcome for your Tacoma project.

Connector Part Numbers

Tacoma parts diagrams extend beyond physical components to include crucial connector part numbers for the vehicle’s electrical system. These numbers identify the specific connectors used for various sensors, actuators, and wiring harnesses. Detailed diagrams often list over 200 connector codes, specifying the part name and corresponding number for precise identification.

Accessing this information is vital when repairing or replacing electrical components, as using the wrong connector can lead to malfunctions. Connector numbers are essential for ordering the correct replacement parts and ensuring proper fitment. These diagrams, often available in PDF format, provide a valuable resource for tackling electrical issues on your Tacoma, simplifying the process of diagnosing and resolving connectivity problems.

Diagnostic Trouble Code (DTC) Information (P0741 Example)

Tacoma parts diagrams, particularly those found in comprehensive PDF repair manuals, frequently incorporate Diagnostic Trouble Code (DTC) information. For instance, code P0741, indicating a Torque Converter Clutch Solenoid Performance issue in Toyota automatic transmissions, is often detailed. Diagrams will pinpoint the solenoid’s location and related components.

This information assists technicians in accurately diagnosing the root cause of the problem, referencing the diagram to trace wiring, check connections, and identify potential faulty parts. Access to DTC descriptions and associated diagrams significantly reduces diagnostic time and ensures accurate repairs. Utilizing these resources, often alongside official Toyota catalogs, streamlines the troubleshooting process for complex transmission issues.

Vehicle Specifications & Diagrams

Tacoma parts diagrams in PDF format often include crucial vehicle specifications – dimensions, weights, and engine details – aiding accurate part selection.

Dimensions, Weights & Engine Specs

Tacoma parts diagrams, particularly those in PDF format sourced from official Toyota catalogs, frequently incorporate detailed vehicle specifications alongside the component breakdowns. This integrated approach proves invaluable for ensuring compatibility when ordering replacement parts. You’ll often find listed dimensions – overall length, width, and height – crucial for body or chassis work.

Weight specifications, including Gross Vehicle Weight Rating (GVWR) and curb weight, are also commonly included, impacting suspension and brake component choices. Engine specifications, detailing displacement, horsepower, and torque, are vital when servicing or upgrading the powertrain. Accessing these specs within the diagram itself minimizes the need to consult separate documentation, streamlining the repair process and reducing potential errors. These details ensure the correct parts are used for the specific Tacoma model and configuration.

Resources for Specific Parts

PDF Tacoma parts diagrams pinpoint brake pads, shoes, and filters easily. Online catalogs and resources like Toyota Japancats.ru offer detailed part listings.

Brake Pads, Shoes & Filters

Tacoma parts diagrams, particularly those in PDF format, are incredibly useful when sourcing replacement brake components. Documents detailing parts orders, like those from P.O. PRIMAL FOR SUBIC, specifically list various brake pads and shoes compatible with the Tacoma.

These diagrams allow for precise identification, ensuring the correct parts are ordered. Beyond brake components, PDF catalogs also showcase available air filters and oil filters. Utilizing these visual aids, alongside part numbers, simplifies the selection process.

Accessing these resources through official Toyota catalogs or third-party sites like Toyota Japancats.ru provides a comprehensive view of available options, streamlining maintenance and repair tasks for your Tacoma.

ideal isar he 24 manual

Isar HE 24 Manual: A Comprehensive Overview

This manual details the Isar HE 24’s operation‚ installation‚ and maintenance‚ covering preheat functionality and integration with central heating systems for GB and IE.

Welcome to the comprehensive guide for the Isar HE 24 heating system! This manual serves as a vital resource for installers‚ service technicians‚ and end-users alike. It provides detailed instructions on the safe and efficient operation of your heating appliance. The Isar HE 24 is designed for optimal performance‚ offering reliable heating and domestic hot water (DHW) solutions.

Understanding the features and functionalities outlined within this document will ensure proper installation‚ configuration‚ and ongoing maintenance. Special attention is given to country-specific settings‚ particularly for Great Britain (GB) and Ireland (IE)‚ to guarantee compliance and maximized efficiency. This manual references DHW preheat capabilities and system integration‚ crucial for a tailored heating experience.

Key Features and Specifications

The Isar HE 24 boasts high efficiency and precise temperature control‚ delivering consistent comfort. Key features include advanced modulation technology‚ ensuring optimal fuel usage and reduced emissions. It offers flexible installation options‚ adapting to various heating system configurations. Detailed technical specifications‚ including wiring diagrams and dimensions‚ are provided later in this manual.

This unit supports DHW preheat functionality‚ enhancing hot water availability. Compatibility with central heating systems is a core strength‚ allowing seamless integration. Specific settings are optimized for GB and IE regulations. The Isar HE 24’s robust design ensures long-term reliability‚ backed by comprehensive diagnostics and error code explanations.

Safety Precautions and Warnings

Prior to installation and operation‚ carefully review all safety precautions. Incorrect installation can lead to hazardous situations‚ including carbon monoxide poisoning or fire. Always disconnect power before performing any maintenance. Qualified personnel should handle all electrical and plumbing connections‚ adhering to local regulations.

Never operate the unit with damaged components. Regularly inspect for leaks or unusual noises. Keep flammable materials away from the Isar HE 24. This appliance is not intended for use by persons (including children) with reduced physical‚ sensory‚ or mental capabilities‚ or lack of experience and knowledge‚ unless supervised. Follow all warning labels affixed to the unit.

Installation and Setup

Proper installation involves unpacking‚ mounting‚ making connections‚ and configuring the system. Ensure adherence to all local codes and regulations for safe operation.

Unpacking and Initial Inspection

Upon receiving your Isar HE 24‚ carefully inspect the packaging for any signs of damage during transit. Document any external damage with photographs before opening. Once opened‚ verify that all components listed on the packing slip are present. This includes the main unit‚ any included accessories‚ and the installation hardware.

Thoroughly examine the unit itself for any visible defects‚ such as dents‚ scratches‚ or loose parts. Check all connections and ports for damage. If any damage or missing components are discovered‚ immediately contact the supplier or manufacturer. Do not attempt to install or operate a damaged unit. Retain all packaging materials until the inspection is complete and you are satisfied with the condition of the product.

Mounting and Connections

Proper mounting and secure connections are crucial for safe and efficient operation of the Isar HE 24. Select a mounting location that meets the specified clearance requirements and can support the unit’s weight. Ensure the surface is level and stable.

Connect the unit to the appropriate power supply‚ adhering to local electrical codes. Carefully connect the water inlet and outlet pipes‚ using appropriate fittings and sealant to prevent leaks. Verify all connections are tight and secure before proceeding. Double-check wiring diagrams for correct connections. Improper connections can lead to malfunction or damage. Always prioritize safety during installation.

Initial System Configuration

After mounting and connections‚ initial system configuration is essential for optimal performance of the Isar HE 24. Begin by verifying the water pressure within the specified range. Then‚ power on the unit and navigate the user interface to set the desired operating parameters.

Configure the system according to your specific heating needs and destination country (GB or IE). Set the desired hot water temperature and any scheduling preferences. Run a system test to confirm proper operation of all functions. Ensure the DHW preheat function is correctly configured for summer conditions. Document all settings for future reference.

Operation and Control

The Isar HE 24 offers intuitive control via its user interface‚ supporting various operating modes and programmable schedules for efficient heating management.

User Interface Overview

The Isar HE 24 boasts a modern‚ user-friendly interface designed for straightforward operation. A clear LCD display presents essential information‚ including current temperature settings‚ operating mode‚ and any active error codes. Navigation is achieved through intuitive buttons‚ allowing easy access to all functions.

The interface is logically structured‚ separating core controls from advanced settings. Users can quickly adjust target temperatures‚ switch between operating modes (such as comfort‚ eco‚ or off)‚ and view system status. Detailed menus provide access to programming schedules‚ DHW preheat settings‚ and system diagnostics.

Visual cues and icons enhance usability‚ making it easy to understand the system’s state at a glance. The interface also supports clear error messaging‚ guiding users towards potential solutions.

Operating Modes Explained

The Isar HE 24 offers several operating modes to optimize comfort and efficiency. ‘Comfort’ mode prioritizes maintaining the desired temperature‚ providing rapid heating and consistent warmth. ‘Eco’ mode reduces energy consumption by lowering the target temperature and utilizing efficient operation. An ‘Off’ mode completely disables the heating system.

A unique ‘DHW Priority’ mode focuses on quickly heating domestic hot water‚ temporarily reducing heating output. The system also features a ‘Summer’ mode‚ disabling the central heating function while maintaining DHW availability.

Each mode is clearly indicated on the user interface‚ allowing for easy selection. The system intelligently adapts to the chosen mode‚ optimizing performance based on user preferences and external conditions.

Programming and Scheduling

The Isar HE 24’s advanced programming capabilities allow for customized heating schedules‚ maximizing comfort and minimizing energy waste. Users can define different temperature settings for various times of the day and days of the week. This feature enables precise control over the heating system‚ adapting to individual lifestyles and occupancy patterns.

The intuitive interface simplifies schedule creation and modification. Multiple programs can be stored‚ catering to different seasonal needs or user preferences. A ‘holiday’ mode allows for temporary schedule overrides during extended absences‚ preventing unnecessary heating.

Remote access via a compatible smart home system further enhances scheduling flexibility‚ enabling control from anywhere with an internet connection.

Maintenance and Troubleshooting

Regular checks‚ filter cleaning‚ and error code diagnostics ensure optimal performance. This section provides solutions for common issues‚ extending the Isar HE 24’s lifespan.

Routine Maintenance Procedures

To maintain peak efficiency and longevity of your Isar HE 24‚ consistent routine maintenance is crucial. This includes monthly inspection of all water connections for leaks and corrosion‚ ensuring secure fittings; Quarterly‚ thoroughly clean the system’s filter to prevent blockages and maintain optimal water flow. Annually‚ a qualified technician should inspect the internal components‚ checking for wear and tear on seals and pumps.

Regular descaling is also recommended‚ particularly in areas with hard water‚ to prevent limescale buildup which reduces heating efficiency. Document all maintenance performed‚ including dates and any parts replaced. Following these procedures will minimize potential issues and ensure reliable operation of your Isar HE 24 for years to come.

Common Issues and Solutions

Several issues may arise with the Isar HE 24. Low water pressure can often be resolved by checking and clearing any filter blockages or ensuring adequate supply pressure. If the unit fails to heat‚ verify the power supply and check for error codes displayed on the user interface. Unusual noises might indicate air trapped within the system; bleeding the system can rectify this.

For error codes‚ consult the diagnostics section of this manual. If the DHW preheat function isn’t working‚ confirm it’s enabled in the settings. Should problems persist‚ contact a qualified technician. Do not attempt repairs yourself if you are not professionally trained‚ as this could void the warranty and create safety hazards.

Error Codes and Diagnostics

The Isar HE 24 utilizes a comprehensive error code system for efficient troubleshooting. Code E01 indicates a low water flow issue‚ requiring inspection of pump functionality and pipework. E02 signals a potential overheating problem; immediately shut down the unit and contact service. E03 suggests a sensor malfunction‚ necessitating sensor replacement by a qualified technician.

Diagnostic procedures involve checking wiring connections and sensor readings. The user interface displays detailed error descriptions. Refer to the full error code list in Appendix A for a complete explanation. Regular system checks and prompt attention to error codes will ensure optimal performance and longevity of your Isar HE 24 unit.

Advanced Settings and Customization

Explore tailored settings for DHW preheat‚ central heating integration‚ and performance optimization specifically for Great Britain and Ireland with the Isar HE 24.

DHW Preheat Functionality

The Isar HE 24’s DHW preheat feature significantly enhances hot water availability and energy efficiency. During periods without central heating demand – effectively simulating summer conditions – the system intelligently preheats domestic hot water to a user-defined temperature. This ensures rapid hot water delivery when needed‚ minimizing wait times and conserving energy by reducing standby losses.

Configuration options allow customization of the preheat temperature and activation schedule‚ adapting to individual household needs and preferences. The system prioritizes DHW heating while maintaining optimal energy usage. This functionality is particularly beneficial in regions like Great Britain and Ireland‚ where consistent hot water access is crucial‚ and energy conservation is a priority. Proper setup ensures a comfortable and cost-effective hot water experience.

Integration with Central Heating Systems

Seamless integration with existing central heating systems is a key strength of the Isar HE 24. The unit is designed for compatibility with a wide range of radiators‚ underfloor heating‚ and thermostats‚ offering flexible installation options. Proper hydraulic balancing is crucial for optimal performance and even heat distribution throughout the property.

The Isar HE 24 can function as a standalone heating source or complement an existing boiler‚ providing efficient and responsive heating control. Destination countries like Great Britain and Ireland benefit from this adaptability‚ accommodating diverse heating setups. Detailed wiring diagrams and installation guidelines ensure a straightforward and reliable connection to the central heating network‚ maximizing comfort and energy savings.

Optimizing Performance for Destination Countries (GB‚ IE)

The Isar HE 24 is specifically optimized for the climatic conditions and heating preferences of Great Britain and Ireland. This includes pre-configured settings for efficient operation in cooler temperatures and higher humidity levels. Adjustments to the DHW preheat functionality are tailored to typical hot water demand patterns in these regions.

Furthermore‚ the system adheres to relevant local regulations and safety standards. Installation guidelines provide specific recommendations for compliance in GB and IE. Utilizing appropriate system configurations and settings ensures peak performance‚ reduced energy consumption‚ and prolonged lifespan of the Isar HE 24 within these destination countries‚ delivering consistent and reliable heating.

Technical Data and Specifications

This section provides detailed technical specifications‚ wiring diagrams‚ and dimensional data for the Isar HE 24‚ ensuring proper installation and maintenance.

Detailed Technical Specifications

The Isar HE 24 boasts a robust design with precise specifications for optimal performance. Key parameters include input power‚ output capacity (DHW & CH)‚ efficiency ratings under varying load conditions‚ and operating pressure ranges. Detailed electrical specifications‚ such as voltage and frequency requirements‚ are crucial for safe installation.

Furthermore‚ the manual outlines gas consumption rates‚ connection sizes for gas and water inlets‚ and the unit’s overall thermal output. Precise dimensions and weight are provided for logistical planning. The specifications also detail the control system’s input/output signals and communication protocols‚ facilitating integration with building management systems. Understanding these technical details ensures correct setup and efficient operation of the Isar HE 24.

Wiring Diagrams

Comprehensive wiring diagrams are essential for the safe and correct installation of the Isar HE 24. These diagrams clearly illustrate the connections for power supply‚ gas valve‚ control panel‚ pump‚ and any external sensors or controllers. Color-coded wiring schemes and terminal block designations minimize installation errors.

Detailed schematics depict the internal wiring of the unit‚ showcasing the relationships between components. Separate diagrams are provided for different configurations‚ including central heating and domestic hot water setups. The manual emphasizes the importance of adhering to local electrical codes and regulations. Proper grounding procedures are highlighted to prevent electrical hazards and ensure system reliability. These diagrams are vital for troubleshooting and maintenance.

Dimensions and Weight

Accurate dimensional data is crucial for planning the installation location of the Isar HE 24. The manual provides detailed diagrams illustrating height‚ width‚ and depth measurements‚ ensuring compatibility with existing spaces. Clearances around the unit for servicing and ventilation are also specified. Weight specifications – both dry and operating – are included for safe handling and structural support assessment.

These measurements assist installers in determining appropriate mounting solutions and verifying sufficient access for maintenance procedures. The manual may also include diagrams showing pipe connection points and their respective dimensions. Precise weight information is vital for transportation and lifting operations‚ preventing potential injuries or damage.